ATTENTION: If you have an IT person that manages your Computers or your Network, PLEASE make sure you ask their permission/approval before doing anything explained below. This can break a connection to a main office or server if the IT department has setup some kind of internal network for your company/organization. If you are a private business this may not apply to you but verify first anyway.
You will need to go to the following folder on your Windows 10 Computer:
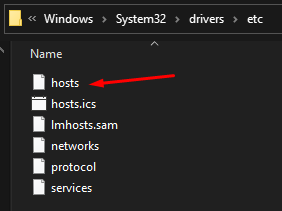
C:WindowsSystem32driversetc
Then you will see a file there with no extension called. . “hosts”
This file may or may not be editable for you.
Open it in Notepad, add a new line to the file by clicking at the end of the last line and pressing enter/return on your keyboard 2 times to make a new line and try saving.
If it will let you save you can just add the provided information to that line and save.
(you will have received an IP address and your domain from us and it will have looked something like this.. 34.74.175.191 yourdomain.com)
If you cannot save the file due to Windows saying it is not an editable file, you will need to save the file to your desktop.
Once the file is on your desktop you will need to enable File Name Extensions

Then rename the file on your desktop from “hosts.txt” to just… “hosts” (with NO .txt at the end) And say yes when it pops up to let you know you are changing the file format. That is what you’re doing.
Then drag that file into the “C:WindowsSystem32driversetc” folder and say yes to the overwrite file popup.
Then go to the website you just put this hosts file entry in for and test it in your browser but when you go there, if in Chrome or Firefox refresh the page by using Control Shift and R to refresh and clear cache at the same time. If you do not see the new website, then please contact us at (419) 651-2163.
Apple/Mac users: Try this: https://setapp.com/how-to/edit-mac-hosts-file